
Blender's rendering capabilities have continued to evolve, offering artists more control over lighting and post-processing workflows. One of the most powerful additions in recent versions is the Light Groups feature which is definitely a game-changer for achieving precise render control and creative flexibility. Whether you're refining subtle lighting details or creating dramatically different mood variations in a single render pass, Blender Light Groups can unlock an entirely new dimension to your 3D workflow. Check out the article to learn more!
This step-by-step guide will walk you through enabling, using, and optimizing Light Groups in Blender, showcasing practical applications and helpful tips. By the end, you'll understand how to isolate and manipulate individual light sources without the need to re-render your entire scene and saving both time and resources.
Before diving into the step-by-step guide, I recommend watching this quick 1-minute video tutorial by Approximated as it offers a great first glimpse into this powerful and practical workflow. The video tutorial offers a quick and practical walkthrough on how to use Light Groups as it begins by setting up a basic scene with imported furniture, an HDRI environment, and various lights, including emissive and point lights. The creator then demonstrates how to create and assign multiple light groups through the View Layer and Object Properties panels, including for the world environment. In the compositor, the tutorial shows how each light group outputs a separate render pass, which can be blended together using Mix nodes in Add mode. This setup allows users to adjust the intensity of individual light sources independently making it an efficient and flexible lighting workflow.
Step-by-Step Workflow for Light Groups.
Before diving into the setup, ensure you are using Blender 3.2 or later, where Light Groups were officially integrated into Cycles. Earlier builds may still require experimental settings or beta versions. After these four basic steps you will be able to watch another more descriptive video tutorial so that you totally understand and be able to handle the suggested workflow.
Step 1 - Create a New Light Group.
Begin by opening your scene in Blender and navigating to the Shader Editor or the View Layer Properties Panel. Within the View Layer tab, scroll down to find the Light Groups section. Click ‘+’ to create a new light group and assign it a meaningful name such as "Key_Light", "Fill_Light", or "Interior_Lamps". Clear and descriptive naming is essential, especially for complex scenes involving multiple light sources.
You’ll want to plan your groups ahead of time based on the functional role of each light in your setup. For instance, you might separate lights into groups based on their contribution and that means one for key illumination, one for accent or rim lighting, another for environment lighting, and so on.
Step 2 - Assign Lights to Your Group.
Once your groups are created, select the individual light objects you wish to assign. In the Properties Panel > Object Data > Light section, you’ll find the Light Group drop-down menu. Use this to assign the light to the appropriate group.
It’s important to note that a single light can only belong to one group at a time. If you encounter an issue where your light seems unresponsive in the compositor, double-check that it has been properly assigned and that the group is active in your view layer settings.
A common mistake is forgetting to assign the group to a specific View Layer, which means the group won’t render or show up in the compositor later. Make sure each group is visible and active in the layer you’re working on.
Step 3 - Prepare and Render the Scene.
With your lights assigned to groups, head to the Render Properties tab and ensure that your renderer is set to Cycles. Under the View Layer Properties, confirm that the relevant Light Groups are enabled.
If you plan to use multiple layers or passes, configure your Render Layers accordingly. It’s good practice to do a quick test render with minimal samples to make sure all light contributions are captured.
Then, initiate a full render. Behind the scenes, Blender is now storing each light group’s contribution as a separate render pass, which will be available for post-processing in the compositor.
Step 4 - Use Light Groups in Compositor.
After the render is complete, switch to Blender’s Compositing Workspace and check the “Use Nodes” option. From here, press Shift + A and add the ‘Light Group’ node from the Render Layers menu.
Each active light group will have its own node socket. You can now manipulate the output from each group individually, adjusting intensity, color balance, or even masking specific areas.
Let’s say you want to increase the intensity of your rim light without re-rendering. Simply multiply the output of that light group node and plug it into your final composite. You can also tint one group to warm up interior lights or cool down moonlight outside.
This granular level of control makes Light Groups particularly powerful in post, where small adjustments can have major visual impact without costing additional render time.
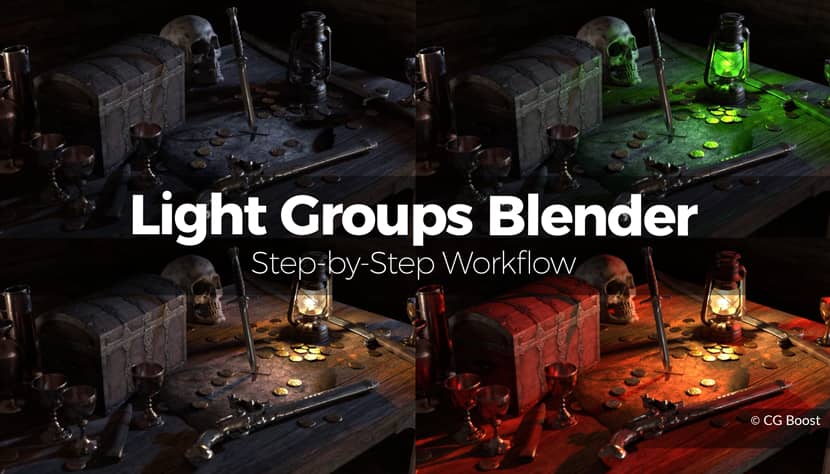
And as promised here is a more descriptive video tutorial by CGBoost. The video begins by showing a scene setup with three light sources: sunlight, a lantern, and an HDRI environment. The creator walks through creating separate light groups and assigning each light to its respective group via the properties panel. After rendering, the tutorial demonstrates how to use Blender’s compositor to access each light group as an individual pass. By combining them with Mix nodes and applying Color Correction nodes, users can adjust brightness, tint, and mood, transforming a daylight scene into night or animating lights on and off. The key benefit emphasized is the non-destructive, re-render-free workflow, ideal for quick iteration and creative flexibility in both still images and animations.
Practical Applications of Light Groups.
Adjusting Light Passes.
With Light Groups, every lighting pass is yours to tweak. Want your key light more dominant? Dial it up. Want to mute that background lamp that feels too distracting? Bring it down to subtle levels.
This is invaluable for artists who need to iterate quickly or deliver multiple visual styles for client feedback. Having separate light groups means you can effectively re-light your scene in post-processing.
A good example is splitting your key, fill, and rim lights into separate groups. This allows for nuanced tuning of highlights, shadows, and background ambiance, all without needing to touch the 3D viewport again.
Day to Night Lighting Swaps.
One of the most impressive capabilities of Light Groups is how they allow dynamic lighting changes in post. For example, by creating separate groups for artificial lights and natural sunlight, you can fade between a daytime render and a night scene by simply adjusting the group visibility and strength.
You don't need to re-render the full scene, you just fade down the sunlight group and fade up the artificial lights. It's perfect for architectural visualizations, animated transitions, or exploring creative moods from the same base setup.
Tips for Combining and Optimizing Light Groups.
While Light Groups are powerful, they can become a mess if not handled with care. Here are some key strategies to optimize your workflow:
- Keep your naming convention consistent. Use prefixes like "LG_" for easier sorting and clarity.
- Avoid creating too many light groups unless necessary. Group lights based on logical categories such as by source, purpose, or region in the scene.
- Be aware of noise and fireflies that might appear in one group but not in others. If this happens, consider adjusting your sample rates or clamping values individually in compositing.
- For animations, Light Groups can dramatically speed up look development. You can create several lighting versions from a single render sequence and experiment with timing, effects, and mood without needing to rerun the entire frame set through Cycles.
Final Thoughts: Benefits of Light Groups in Blender.
The Light Groups feature in Blender represents a milestone in render control. It transforms lighting from a rigid, pre-rendered setting into a flexible, modular system you can tweak after the fact.
Whether you’re an experienced 3D artist or just getting into lighting, embracing this feature will elevate your ability to craft compelling, professional-grade visuals. You can swap moods, fix lighting imbalances, or generate style variants and all of these in post.
And the best part? It’s all non-destructive. You no longer have to fear redoing your lighting from scratch just to test a variation. With Blender Light Groups, what you render is just the beginning of what you can create.
So go ahead and experiment with your lighting setups. Try creating multiple moods, simulate real-world lighting scenarios, and push the limits of what’s possible inside Blender’s powerful compositor. Once you’ve tried it, there’s no turning back.
We hope that this article gave you all necessary information to start experimenting with Light Groups in Blender and Cycles so that you can improve your workflow and become more flexible.
Kind regards & Keep rendering! 🧡

About the author
Vasilis Koutlis, the founder of VWArtclub, was born in Athens in 1979. After studying furniture design and decoration, he started dedicating himself to 3D art in 2002. In 2012, the idea of VWArtclub was born: an active 3D community that has grown over the last 12 years into one of the largest online 3D communities worldwide, with over 160 thousand members. He acquired partners worldwide, and various collaborators trusted him with their ideas as he rewarded them with his consistent state-of-the-art services. Not a moment goes by without him thinking of a beautiful image; thus, he is never concerned with time but only with the design's quality.
![]()
![]()
![]()
![]()
![]()
